The Web Dev Checklist

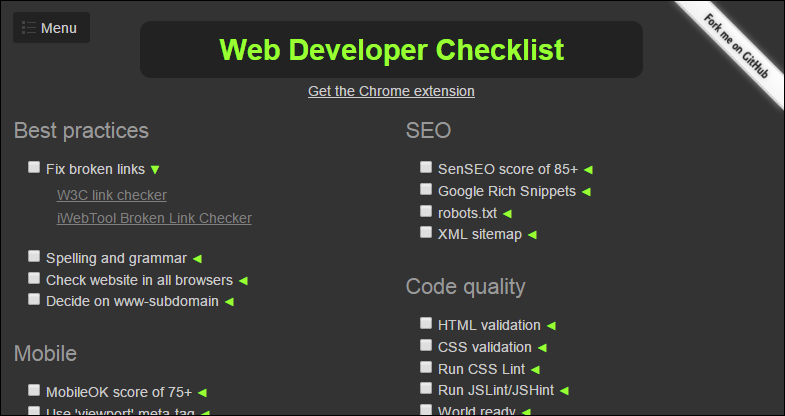
Here at Extra Nerds, we love check lists, and we always try to adhere to industry best practices. So when we came across this handy little website we wanted to share it with you. Check out http://webdevchecklist.com. It contains a list of to-do items every web developer should complete when developing a website. It covers everything from SEO, security, social media, and more. Chances are, if you're a web developer, this list contains many of the tasks you already do. But, there's a very good chance there are a few things in there you might not be doing.

And, of course, if you're not a web developer or if you need extra help from some Extra Nerds making sure your website is as modern and effective as it can be, feel free to contact us. Our Nerds will make sure all the items in this check list and met and that your website is the best that it can be.

Posted on April 9, 2015 .

Create a custom WordPress theme: Step 5

There are many different WordPress themes available, but sometimes you just cannot find the one that will fit your needs. When that happens, it is time to create your very own custom theme. I will show you in a series of six steps how to do just that.

In step 1 we learned how the themes work, a first step in creating your own custom theme for WordPress.

In step 2 we learned to create the template files.

Step 3 taught us about the header file and step 4, the footer.  Now, let’s consider the sidebar.

Step 5.

The side bar is located on the side of your website page, you can choose to have it on either right or left side. Most commonly people choose the left, but you should put it where you are most comfortable. To create the sidebar file:

The Sidebar File: name it sidebar.php

<div id="sidebar">

<h2 class="sidebartitle"><?php _e('Categories'); ?></h2>

<ul>

<?php wp_list_cats('sort_column=name&optioncount=1&hierarchical=0'); ?>

</ul>

<h2 class="sidebartitle"><?php _e('Archives'); ?></h2>

<ul class="list-archives">

<?php wp_get_archives('type=monthly'); ?>

</ul>

</div>

The sidebar will contain the categories , archives, text widgets and other sidebar attributes.

So, you’re almost there in creating your own custom theme for WordPress! You should now have an understanding of how custom themes work and the technical knowledge on how to create your files.  Stay tuned for step 6, the final lesson.

Posted on April 3, 2015 and filed under Custom Wordpress Themes.

The White House goes after hackers, and Extra Nerds shields you from danger

Photo by Mister GC at&nbsp;FreeDigitalPhotos.net

Photo by Mister GC at FreeDigitalPhotos.net

The White House today announced its intent to crack down on hackers, phishers, and other cyber security threats,  implementing sanctions against criminals domestic and abroad. More details are available over at Mashable. While this is a long overdue endeavor, it may not deter malicious individuals from continuing to cause harm. For that reason, in addition to providing services around setting up and maintaining WordPress based websites, Extra Nerds has launched a new managed web hosting service. Using proprietary third-party software, we can now create beautiful, mobile-friendly e-commerce websites for your organization and shoulder the responsibility of protecting your website from hackers and malware. Please check out our service offerings, and contact us if you're interested in learning more about establishing a web presence without all the stress of protecting it from hackers.

Posted on April 1, 2015 .

Create a custom WordPress theme: Step 4

There are many different WordPress themes available, but sometimes you just cannot find the one that will fit your needs. When that happens, it is time to create your very own custom theme. I will show you in a series of six steps how to do just that.

In step 1  we learned how the themes work, a first step in creating your own custom theme for WordPress.

In step 2 we learned to create the template files and step 3 taught us about the header file. Now, let’s look at the footer.

Step 4.

The footer of the website is where the copyright information is located.  Other items can be placed there as well, if you’d like, such as a menu, contact information, resource links,  or any similar type of information that you would like to convey to your audience. But let’s start with the basics.

The Footer File:  name it:  footer.php

<div id="footer">

<h1>This is the footer</h1>

</div>

</div>

< ?php wp_footer(); ? >

</body>

</html>


So, this is fourth step in creating your own custom theme for WordPress. You should now have an understanding of how custom themes work and the technical knowledge on how to create your template files as well as your header and footer.  It should feel like it’s all coming together at this point. Stay tuned for the final steps!

Posted on March 27, 2015 and filed under Custom Wordpress Themes.

Create a custom WordPress theme: Step 3

There are many different WordPress themes available, but sometimes you just cannot find the one that will fit your needs. When that happens, it is time to create your very own custom theme. I will show you in a series of six steps how to do just that.

In step 1 we learned how the themes work, a first step in creating your own custom theme for WordPress.

In step 2 we learned to create the template files. Now, it’s time to look at creating the header file.

Step 3.

As you know, the theme will need a header file which is the top portion of the website, usually where the logo and other top elements reside.  Other components can be added, but for now let’s keep it simple.

The Header File: name it header.php

<html>

<head>

<title>My Theme</title>

<link rel="stylesheet" href="<?php bloginfo('stylesheet_url'); ?>">

</head>

<body>

<div id="wrapper">

<div id="header">

<h1>This is the header</h1>

</div

You should now have a solid understanding of how custom themes work and the technical knowledge on how to create your template and header files. Stay tuned for step 4.

Posted on March 20, 2015 and filed under Custom Wordpress Themes.

Create a custom WordPress theme: Step 2

There are many different WordPress themes available, but sometimes you just cannot find the one that will fit your needs. When that happens, it is time to create your very own custom theme. I will show you in a series of six steps how to do just that.

In step 1 we learned how the themes work, a first step in creating your own custom theme for WordPress. Our second step is to create the template files.

Step 2.                              

The first file we are going to create is the index.php file.

Open up your text editor and create a new file called index.php where you will enter the following code:

<?php get_header(); ?>

<div id="main">

<div id="content">

<h1>Main Content </h1>

<?php if (have_posts()) : while (have_posts()) : the_post(); ?>

<h1><?php the_title(); ?></h1>

<h4>Posted on <?php the_time('F jS, Y') ?></h4>

<p><?php the_content(__('(more...)')); ?></p>

<hr>

<?php endwhile; else: ?>

<p><?php _e('Sorry, we couldn’t find the post you are looking for.'); ?></p>

<?php endif; ?>

</div>

<?php get_sidebar(); ?>

</div>

<div id="delimiter"></div>

<?php get_footer(); ?>

You can make changes between the <h1> tags and the text that reads "Posted on" after the <h4> tag can be customized to something else that works for you. You can make the changes now or at a later time, but it is important to remember that, since these are template files, the changes will be reflected across your entire site.

So, this is second step in creating your own custom theme for WordPress. Stay tuned for step 3 when we'll talk about your header file.

Posted on March 13, 2015 and filed under Custom Wordpress Themes.

CSS Tips and Tricks: Part 1 of 6

display:none;

Disclaimer: This series of CSS Tips and Tricks will assume you have at least an intermediate level understanding of HTML and CSS.

HTML websites we start to wonder, is there any way I can spice up this bland world of boxes? Can I make my boxes not be boxes? Is there any way to make my text hot pink and my pages’ background sky blue?! So hopefully that last one has never been a motivator for you to learn how to code Cascading Style Sheets (CSS), but you get the picture. In our journey through styling web pages we come across the display attribute. This attribute has been the cause of many headaches, as well as many breakthroughs in terms of styling web pages. There are some pitfalls any web designer and/or developer should be weary of when using this CSS attribute. Consider the following three things to always keep in mind:

What does “display:none;” do?
I will keep this brief, but just so we have some context I felt I should give a little description of what the display attribute can do. According to w3schools.com, “Setting the display property of an element only changes how the element is displayed, NOT what kind of element it is.” Pretty intuitive. There are many values the display attribute can use, but the most common are probably the following: “inline”, “inline-block”, “block”, or “none”. Changing an HTML element’s display attribute to anything different to what that element’s native display value is will change how it affects the overall layout of your pages. Consider an HTML div element. By default, it is a block-level element, but if you set its display attribute to “inline” it will now collapse to only consume as much space as is needed to fit its content. If we then set that same div’s display property to none, POOF! It now appears to be gone. The space it occupied becomes vacant and other elements will (most likely) fill the void of where the div once occupied. However, under the hood in the raw HTML the div is still reallythere, it is just set to “display:none;”

Why am I using “display:none;”?
This is another very important question when considering to use “display:none;”. In answering this question you can determine if “display:none” is the correct solution to “hiding” the HTML content in question. There are three things to consider when using “display:none” which are: space, load speed, and SEO. Let’s consider the first:

Space
This is probably the most familiar consideration most people find the correct solution to, but again, I wanted to mention it. If you want to hide content, but still allow it to take its space within the web page then you want to use a different CSS attribute, “visibility:hidden;”. This will hide the HTML element (and all of its children) but still allow it to take its given space on the web page. However, “display:none;” will completely remove the HTML element (and all of it’s children) from the web page’s rendered layout. Now, let’s consider two other points.

So you may say to yourself, “Yes, I want it completely gone from the rendered web page’s layout.” This raises two things I would like you to consider before slapping a “display:none;” on your HTML element.

Load Speeds
Do you have any other CSS rules (such as a “:hover” pseudo-class) or JavaScript functionality that exists on the web page which will allow the end-user of your website to ever make the HTML element in question seeable? If not, why are you even loading it on the page in the first place? If the content inside of the HTML element is dynamic (maybe some kind of custom query you do on the backend to render this element’s content) then you are putting an unnecessary added load time on your end-user. By putting a “display:none;” on this HTML element you only affect it once your end-user has downloaded it and its content. See what I mean? There is no reason why to even load the content first – save your end-user some load time and just remove the mark-up or backend code that produces it in the first place.

SEO and Screen Readers
So you say to yourself, “Yes, I have functionality which allows the display:none; content to be shown via an onclick event in my JavaScript code.” That’s fine and dandy! There are many, many places where this is completely acceptable. However, you should consider howimportant the content is which is initially loaded on the page with a “display:none;” on it. Although there is some debate as to whether Google’s web ranking algorithm cares about hidden content (and in reality Google search ranking is all anyone cares about), there is good reason to suspect Google either completely ignores “display:none;” content (that is, initially loaded “display:none” elements and their content on your webpage) or gives the content low priority in there search ranking (reference:https://support.google.com/webmasters/answer/66353). The same is true for many screen readers on the market today – many will not even read content that is hidden with a “display:none;”. If you decide the content is important and you would like to rest assured that the content is getting seen by Google and screen readers there are two reasonable solutions.

1) Use this CSS class (thanks to http://css-tricks.com/places-its-tempting-to-use-display-none-but-dont/ – I have modified the class slightly from the cited article but it accomplishes what it is intended to) for the HTML element instead so you can achieve the “same” result as a “display:none;” but still have your content crawled by Google (as well as have eReaders read the content):

.hideElement{

position: absolute;

top:-9999px;

left:-9999px;
overflow: hidden;
clip: rect(0 0 0 0);
height: 1px;

width: 1px;

padding: 0;

margin:0;

border: 0;

}


2) The other way to fix this is to have JavaScript hide the element with a “display:none;” once the page loads. This will ensure that Google sees the content, however, I’m not sure about screen readers (if you are concerned about screen readers just go with option 1). The only downfall of this method is that it relies on JavaScript to drive content, and what if your user has JavaScript disabled? This is a rare encounter, but it does happen. I advise just using the class above for content you want to to completely hide but still have it seen by Google and screen readers.

Warning: Don’t be a wise guy and keyword/content spam with these methods – Google will roast you.

More reading on this topic:

http://css-tricks.com/places-its-tempting-to-use-display-none-but-dont/

http://webdesign.about.com/od/css/f/blfaqhidden.htm

http://alistapart.com/article/now-you-see-me


Posted on January 15, 2015 and filed under CSS Tips and Tricks.

Domestic IT Outsourcing – The Importance of Understanding Time Zones


Outsourcing your projects to contractors in various time zones requires a familiarity with the language of time zones in order to communicate effectively and never miss an important meeting. The simple and common mistake of specifying a time as 9 AM (EDT) when you should have specified 9 AM (EST) can cause you to miss an important meeting. In this article I will explore the complexities of time zones in the U.S. and how to communicate properly to avoid any problems.

The Complexities of Time Zones
Excluding Alaska and Hawaii, the U.S. has four time zones; Eastern, Central, Mountain, and Pacific. When we say “9 AM Eastern”, we’re also saying “8 AM Central”, “7 AM Mountain”, and “6 AM Pacific”. All of these occur at the same time. The map below provides a geographic view of the various time zones:

As you can see, time zone borders do not lie neatly on longitudinal lines or even along state borders. In fact, there are places where these time zone borders don’t seem to make much sense at all. Have a look at Central Idaho, for example. If you’re traveling from Montana to Oregon through Central Idaho, you could leave Central Time Zone, enter Pacific Time Zone, leave Pacific Time Zone, enter Central Time Zone again, and then leave Central Time Zone one last time to finally end back up in Pacific Time Zone… and all while traveling in a straight line East to West. What’s the lesson? It’s not readily apparently which time zone a city is in when it’s near a time zone border. Ask your business contacts for their time zone, and keep this information in your CRM system or contact book.

In addition to these crazy borders, there are more complexities. Twice per year we set our clocks forward or backward by one hour to account for Daylight Savings Time. There’s a rich history behind this tradition which is not the focus of this article, but interesting nonetheless. On top of this, some places do not participate in this tradition, thus making time zone conversions even more difficult. It’s practically impossible to memorize all of the information needed to make sure you properly communicate meeting times and such. Just make sure you have access to the tools needed to help you when necessary. Many resources exist only to help with time zone conversions and such.

Daylight Savings Time, Standard Time
OK, now we’re going to talk about that which is, probably to most, a misunderstood and misused acronym when communicating meeting time. I’ve seen this a lot in my business. Many people always use “EST”, for example, to specify “Eastern Time”, but that’s not accurate. “EST” means “Eastern Standard Time” not “Eastern Time”, and it’s an acronym that should only be used six months out of the year. “Standard Time” refers to the time of year during the Winter months. “Daylight Savings Time” refers to the time of the year during the Summer months. So, if you want to say “9 AM Eastern” and it’s during the Winter months, only then is it OK to say “9 AM EST”. Otherwise you should say “9 AM EDT” (Eastern Daylight Time). The way I remember this is that, during the Summer we have more daylight. So I know the Summer is “Daylight Savings Time”. I like Summer, so I consider this a special time of year. That’s another way to help me remember that the Winter months are just “standard” months… or “Standard Time”. Here’s the take-away. If your 9 AM meeting is scheduled some time after “Spring forward” and before “Fall back” (ie, the Summer months) then the meeting time should be communicated as “9 AM (EDT)”, “9 AM (CDT)”, “9 AM (MDT)”, or “9 AM (PDT)”… the first letter of the acronym being the time zone abbreviation, and the other two letters standing for “Daylight Time”. Conversely, if your 9 AM meeting is scheduled some time after “Fall back” and before “Spring forward” (ie, the Winter months) then the meeting time should be communicated as “9 AM (EST)”, “9 AM (CST)”, “9 AM (MST)”, or “9 AM (PST)”… the first letter of the acronym being the time zone abbreviation, and the other two letters standing for “Standard Time”. Try to keep this straight and you’ll never be late (or early) for a meeting.

Internet Time
By this point you might be asking yourself “Why does this have to be so complicated?”. It’s a good question. And, it’s a question Swiss watch makers asked themselves when they invented Internet Time. The idea is simple. Let’s get rid of all time zones, time changes, and other unnecessary complexities that always get in the way when we try to communicate event times with each other. There is just one world time, and it’s the same for everyone. The day is no longer divided into 24 hours, but rather 1000 equal parts, called a “beat”. Each beat lasts for about 1 minute 26 seconds. Such a radical shift in or reference of time would not be an easy transition, but there’s no doubt that such a system, once we are acclimated to it, resolves many of the problems we currently face with representing time under out current system of time measurement.

The Lesson & Etiquette
So what do we take away from all of this? The main lesson I want to communicate is that you should always strive to be accurate in your communications of time. Never use acronyms if you’re not sure you know the meaning (“EST” is a common example). Understand that when you communicate time, you are explicitly communicating some or all of the time parameters, and implicitly communicating the rest. For example, if I say “meet me at 9AM”, you understand that I’m referring to 9AM in our mutual time zone. “9 AM” was explicit, and because we both live in the Eastern time zone, for example, the “Eastern Time” was implicit. One last piece of advice regarding etiquette. When communicating with your clients, customers, and other business partners to whom you are providing a service, when you say “9 AM” it should be understood this means “9 AM” in their time zone. As a courtesy to those who give you their business, you always want to make things easier for them and cater to their needs. As such, don’t offload the time zone math onto them. Use their time zone. The same courtesy can/should be extended to you by your vendors and contractors. To remember this, ask yourself which way the money flows. The source of payments should also be the implicit time zone when no time zone is specified.

For some tips on how to manage meetings across multiple timezones with Google Calendar, click here.

And stop back next week for some tips on how to choose the best freelance site to fit your needs.


Posted on January 15, 2015 and filed under Domestic IT Outsourcing.

The five qualities of a good project manager


P is for Prepared

What does it mean to be prepared? When it comes to the art of project management, preparedness can mean the difference between project success or project failure. The team-oriented nature of building out a project demands a PM who knows how to adequately prepare for the series of meetings, status checks and overall communication required to move from one milestone to the next. In the real world, this is not as easy, nor as intuitive as one might imagine.

Prepared is not simply showing up with an agenda, prepared is moving the project closer to completion.

The venue for a PM to demonstrate his/her preparedness is the ever present “project meeting.” Meetings are both a necessity and a burden and no one is more responsible for a meeting’s outcome, good or bad, than the PM. In light of this fact, here are several key elements which I find critical in order to keep a meeting on track.

  • Agenda – of course you need one, and it should be detailed enough to warrant action
  • Obstacles – review them and determine who or what is needed to resolve any roadblocks
  • Break out – action items are moved into another forum, the project meeting is for the high level communication, break out into smaller groups for the real work

Preparedness allows for consistent and adequate communication. In between the larger project meetings, there will always be status updates from individual team members and other types of communication such as email, project calls, and webinars. The key to managing communication such as this effectively again requires the PM to be ready, conduct change management, and to retool. This means moving from Plan A to Plan C in rapid succession and with great attention to detail. One simply cannot move quickly unless one is prepared to move quickly.

Finally, the blood brother of preparedness is precision. Every project worth assigning to a PM has devilish details. Keeping track of the details can be challenging and usually requires third party tools. In my next blog post, I will discuss several techniques/tools which have helped me achieve greater precision in my own work.


Posted on January 15, 2015 and filed under 5 Qualities of a Good PM.

Tips for building a following on Facebook, Part 2: Audience


Doing it Right

According to the 2014 Social Media Industry Marketing Report published by the Social Media Examiner this past May, “a significant 92% of marketers indicate that social media is important to their business, up from 86% in 2013”. Let’s consider the implication of that for a moment, especially since many do not really know how to use this fantastic tool to obtain maximum results.

If you read Part I of this blog series, then you have now determined why you are creating a Facebook page for your business and have a clear objective in mind. So, for Part II, let’s talk about how to create your page right the first time in order to build an audience – the true audience – and how to maintain a following.

Determining your Audience

Businesses may be tempted to outsource their social media work. However, most small business experts, it seems, argue against that. In the initial stages you are building trust and creating a following. You should be in control of the content, engagement and relationships you are developing. Social media is most effective when targeting a specific audience. Take a moment and think about who your target audience might be. For example, let’s say you run a pet grooming business. Your audience would consist of pet owners, animal lovers and advocates, and your local partners such as pet stores, rescue operations and veterinary offices.

Connect with People

Now consider what kind of posts would appeal to your audience and encourage them to engage. An appealing post for this audience might be a local rescue success story or initiate a conversation on how people keep their pets healthy and safe in inclement weather when winter is approaching. If your posts are thought-provoking and alluring to your specific audience, they will get more publicity by followers liking, sharing or commenting. Of course, now that you have their attention, you want to make sure you come back to your brand and your business of pet grooming.

It is more productive to have a small number of dedicated followers than it is to have hundreds who are really not interested in what you’re doing. Remember that Facebook was created as more of a social tool than it was for business purposes, so posts should be fun and casual, but still informative and interesting.

With such an opportunity to reach your audience, don’t get left behind! Spend time on your social media strategy as mentioned in Part I, remember the purpose of your content, engage with your audience, and take advantage of the analytics tools available (a topic which will be discussed later in this blog series). If you use social media effectively, it could prove to be invaluable to your business and help you to stay ahead of the competition.


Posted on January 15, 2015 and filed under Building a FB Following.